


Microsoft Word is a powerful word processing application software that allows you to create a variety of documents, including letters, resumes, and more.
माइक्रोसॉफ्ट वर्ड एक शक्तिशाली वर्ड प्रोसेसिंग एप्लिकेशन सॉफ्टवेयर है जो आपको विभिन्न प्रकार के दस्तावेज़ (डॉक्यूमेंट) बनाने की अनुमति देता है, जिसमें पत्र, रिज्यूमे और बहुत कुछ शामिल हैं।
How to Open Ms-Word (Start Menu)
Open Start menu and type Word. When the Microsoft Word app icon displays, click over it.
स्टार्ट मेनू खोलें और Word टाइप करें, जब माइक्रोसॉफ्ट वर्ड ऐप आइकन दिखेगा, तो उस पर क्लिक करें।
How to Open Ms-Word (Run Command)
रन कमांड बॉक्स खोलने के लिए Win + R दबाएँ, फिर "WinWord" टाइप करें और Enter Key दबाएँ।
The Word Interface

When you open Word for the first time, the Start Screen will appear. From here, you'll be able to create a new document, choose a template, and access your recently edited documents.
जब आप पहली बार Word खोलते हैं, तो स्टार्ट स्क्रीन दिखाई देगी। यहाँ से, आप एक नया डॉक्यूमेंट बना सकते हैं, एक टेम्पलेट चुन सकते हैं, और अपने हाल ही में एडिटिड डॉक्यूमेंट्स तक पहुंच सकते हैं।
Microsoft Word Screen Components

The Quick Access Toolbar


The Quick Access Toolbar lets you access common commands no matter which tab is selected. By default, it includes the Save, Undo, and Redo commands.
क्विक एक्सेस टूलबार: यह आपको सामान्य आदेशों (Commands) तक पहुँचने देता है, चाहे कोई भी टैब चुना गया हो। इसमें डिफ़ॉल्ट रूप से Save, Undo और Redo बटन होते हैं।
The Tell Me Bar

The Tell Me bar allows you to search for commands, which is especially helpful if you don't remember where to find a specific command.
टेल मी बार: यह आपको किसी भी कमांड को खोजने की अनुमति देता है, जो तब बहुत काम आता है जब आपको याद न हो कि कोई विशेष ऑप्शन कहाँ है।
The Ribbon

The Ribbon contains all of the commands you will need to perform common tasks in Word. It has multiple tabs, each with several groups of commands.
रिबन: इसमें वे सभी आदेश होते हैं जिनकी आपको वर्ड में काम करने के लिए ज़रूरत होती है। इसमें कई टैब होते हैं और हर टैब में अलग-अलग कमांड ग्रुप होते हैं।
Ribbon Display Options

- Auto-hide Ribbon: Document ko full-screen mein dikhata hai aur Ribbon ko puri tarah chupa deta hai.
- Show Tabs: Command groups ko chupa deta hai, lekin sirf tabs dikhayi dete hain.
- Show Tabs and Commands: Ribbon ko puri tarah se dikhata hai (Default Setting).
Command Groups
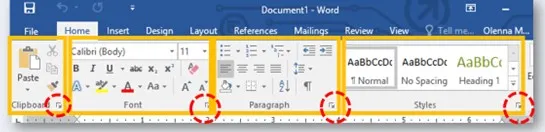
Each group contains a series of different commands. Some groups also have a Group Launcher (small arrow) in the bottom-right corner for advanced options.
कमांड ग्रुप: हर ग्रुप में कई अलग-अलग बटन होते हैं। कुछ ग्रुप के नीचे दाईं ओर एक छोटा तीर (Group Launcher) होता है, जिस पर क्लिक करके आप और भी एडवांस ऑप्शन देख सकते हैं।
The Ruler

The Ruler is located at the top and to the left of your document. It makes it easier to adjust alignment and spacing. Click on View Tab -> Ruler to show or hide it.
रूलर: यह आपके डॉक्यूमेंट के ऊपर और बाईं ओर स्थित है। यह मार्जिन और स्पेसिंग को एडजस्ट करना आसान बनाता है। इसे दिखाने या छिपाने के लिए View Tab में जाकर Ruler पर टिक करें।
Document Pane

This is the main area where you type and edit your text in the document.
डॉक्यूमेंट पेन: यह वह मुख्य क्षेत्र है जहाँ आप अपना मैटर टाइप और एडिट करते हैं।
Document Views & Zoom

- Read Mode: Displays your document in full-screen (best for reading).
- Print Layout: Default view (shows how it will look on paper).
- Web Layout: Shows how your document looks as a webpage.

Zoom Control: Click and drag the slider to zoom in or out. The number reflects the zoom percentage.
The Status Bar

Located at the bottom. It shows page numbers, word count, CAPS Lock, and Num Lock status.
स्टैटस बार: यह सबसे नीचे होता है। यहाँ पेज नंबर, शब्दों की संख्या और कैप्स लॉक जैसी जानकारी दिखती है।
Backstage View (File Menu)

- Info: Current document ki details aur protection ke liye.
- New: Nayi blank file ya templates ke liye.
- Open: Pehle se saved files ko kholne ke liye.
- Save / Save As: File ko computer ya OneDrive par surakshit karne ke liye.
- Print: Print settings aur preview dekhne ke liye.
- Export: File ko PDF/XPS format mein badalne ke liye.
Check Point-1 (Practical Task)
- Word kholen aur ek blank document banayein.
- Ribbon Display Options ko "Show Tabs" mein badlein.
- Quick Access Toolbar mein New, Quick Print aur Spelling ko add karein.
- Tell me bar mein "Shape" type karke koi bhi ek shape insert karein.
- Ruler ko show karein aur document ko 120% zoom par set karein.
- Document view ko Web Layout mein badlein aur fir wapas Print Layout par aayein.
What is a Document?
Word files are called Documents. Jab bhi aap Word mein koi naya kaam shuru karte hain, to aapko ek naya document banana padta hai.
- File Extension: MS Word ka default file extension ".docx" hota hai.
- New Document: File Tab -> New -> Blank Document.
Create Sample Data (Automatic Text)

BCE Pro Tip: Agar aapko specific paragraphs chahiye, jaise 10 paragraphs, to =rand(10) likhein. Isse practice karna aasaan ho jata hai.
How to Save a File
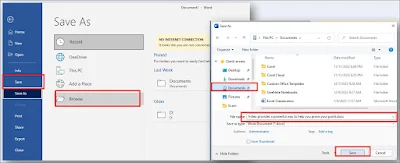
Apni file ko safe rakhne ke liye niche diye steps follow karein:
Process: File -> Save -> Browse -> Choose Location -> Type File Name -> Click Save.
Cursor Movement & Selection Techniques
Document mein tezi se kaam karne ke liye cursor ko move karna aur text ko sahi se select karna aana chahiye. Niche di gayi table mein important shortcuts diye gaye hain:
| KEYSTROKE (Shortcuts) | KYA HOGA (Action) |
|---|---|
| HOME | लाइन के शुरुआत (Beginning) में जाने के लिए। |
| END | लाइन के अंत (End) में जाने के लिए। |
| CTRL + HOME | पूरे डॉक्यूमेंट के सबसे ऊपर (Top) जाने के लिए। |
| CTRL + END | पूरे डॉक्यूमेंट के सबसे अंत (Bottom) में जाने के लिए। |
| Double Click | किसी एक शब्द (Whole Word) को सेलेक्ट करने के लिए। |
| Triple Click | पूरे पैराग्राफ (Whole Paragraph) को सेलेक्ट करने के लिए। |
| CTRL + A | संपूर्ण दस्तावेज़ (Entire Document) को एक साथ सेलेक्ट करने के लिए। |
| Shift + Arrow Keys | एक-एक अक्षर या लाइन को धीरे-धीरे सेलेक्ट करने के लिए। |
Font Group
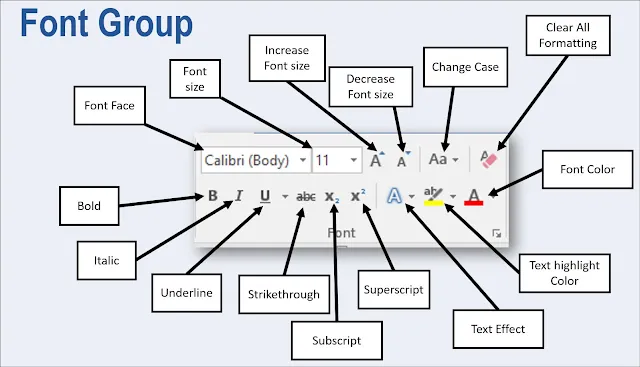
Font group ka upyog text ki appearance (dikhawat) badalne ke liye kiya jata hai. Ismein Font face, size, aur colors jaise options hote hain.
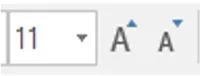
Font Face & Size

Font (Ctrl + Shift + F): Isse aap likhawat ka style badal sakte hain. Apne document ko professional look dene ke liye sahi font chunein.
Change Case

Iska upyog likhe huye text ko Sentence case, lowercase, UPPERCASE ya Capitalize Each Word mein badalne ke liye kiya jata hai.
Basic Formatting (Bold, Italic, Underline)
- Bold (Ctrl + B): Text ko gahra (Dark) karne ke liye.
- Italic (Ctrl + I): Text ko tircha karne ke liye.
- Underline (Ctrl + U): Text ke niche line khinchne ke liye. (Arrow par click karke aap alag-alag underline styles aur colors bhi chun sakte hain).
- Strikethrough: Text ke beech mein ek cutting line banane ke liye.
Subscript & Superscript

Subscript (Ctrl + =): Text ko baseline ke niche likhne ke liye (Jaise: H₂O).
Superscript (Ctrl + Shift + +): Text ko baseline ke upar likhne ke liye (Jaise: A² + B²).
Text Effects & Highlighting
Text Effects & Typography: Text ko stylish design aur shadow dene ke liye.
Text Highlight Color: Text ke peeche rang bharne ke liye (Jaise highlighter pen ka use karte hain).
Font Color: Khud text ka rang badalne ke liye.
Check Point-2
Niche di gayi image jaisa content likhein aur format karein (Practical ke liye):

Paragraph Group

Paragraph group mein text ko align karne, list banane aur lines ke beech space dene ke tools hote hain. Yeh tools aapke document ko organized dikhane mein madad karte hain.
Bullets, Numbering & Multilevel List

Inka upyog points mein list banane ke liye kiya jata hai. Aap symbols (Bullets), Numbers ya nested lists (Multilevel) ka upyog kar sakte hain.
Indent Tools

Increase Indent (Tab): Paragraph ko margin se door le jane ke liye.
Decrease Indent (Shift + Tab): Paragraph ko margin ke paas lane ke liye.
Text Alignment

- Left Align (Ctrl + L): Text ko baayein (Left) taraf set karein.
- Center Align (Ctrl + E): Text ko page ke beech mein layein.
- Right Align (Ctrl + R): Text ko daayein (Right) taraf set karein.
- Justify (Ctrl + J): Text ko dono taraf (Left & Right) se barabar karein.
Line & Paragraph Spacing

Single Line: Ctrl + 1 | Double Line: Ctrl + 2 | 1.5 Line: Ctrl + 5
Shading & Borders


Shading: Paragraph ke peeche background color dene ke liye.
Borders: Selected text ya paragraph ke charo taraf borders lagane ke liye.
Sort & Show/Hide
Sort: Data ko A to Z ya 1 to 10 ke kram mein lagane ke liye (Tables mein bahut kaam aata hai).
Show/Hide (¶): Hidden formatting symbols (jaise space aur enter marks) dikhane ke liye.
Tabs Setting
It is a very useful and handy tool to arrange and manipulate your data in table or columnar format without using actual tables.
टैब सेटिंग: यह टेबल या कॉलम में अपने डेटा को सजाने या व्यवस्थित करने के लिए एक बहुत ही उपयोगी और आसान उपकरण है।

Types of Tabs (टैब के प्रकार)
-
 Left Tab: Text tab position se shuru hokar daayein (right) taraf badhta hai.
-
 Right Tab: Text tab position par khatam hota hai aur baayein (left) taraf badhta hai.
-
 Center Tab: Text ko tab position ke beech mein align karta hai.
-
 Decimal Tab: Numbers ko unke decimal point (.) ke hisaab se align karta hai.
-
 Bar Tab: Tab position par ek vertical line (khadi lakeer) bana deta hai.
Working with Styles

Style: Iska upyog Title, Heading aadi jaise pehle se bane formats ke saath paragraph ko turant format karne ke liye kiya jata hai.
- Jise format karna hai, us paragraph ko select karein.
- Home Tab ke Styles group se apni pasand ki style chunein.
Project on Paragraph & Tabs

Table (टेबल)

A table is a structure of Grid. Vertical parts are called Columns, horizontal parts are Rows, and their intersection is known as a Cell.
तालिका ग्रिड की एक संरचना है। जहाँ खड़ी लाइनें कॉलम और आड़ी लाइनें रॉ होती हैं। इनके मिलन बिंदु को सेल (Cell) कहते हैं।
Methods to Create a Table
Microsoft Word mein table banane ke niche diye gaye char pramukh tarike hain:
1. Quick Tables: Pehle se bane huye professional table formats chunne ke liye.
Process: Insert Tab -> Tables -> Quick Tables -> Choose style

2. Drag Option (Grid): Mouse ko grid par chala kar turant table banane ke liye.
Process: Insert Tab -> Tables -> Drag over grid

3. Insert Table: Rows aur Columns ki sankhya manually type karke table banane ke liye.
Process: Insert Tab -> Table -> Insert Table -> Enter values

4. Draw Table: Pencil tool ka use karke apni marzi ka table design karne ke liye.
Process: Insert Tab -> Table -> Draw Table
Navigating within a Table (Keyboard Keys)
| To Move To... | Press Key |
|---|---|
| Next Cell | Tab or → |
| Previous Cell | Shift + Tab or ← |
| Next / Previous Row | ↑ or ↓ |
| First Cell of Row | Alt + Home |
| Last Cell of Row | Alt + End |
| Alignment within cell | Ctrl + Tab |
Merging and Splitting Cells

Merge Cells: Kai cells ko milakar ek bada cell banane ke liye.
Process: Cells select karein -> Right Click -> Merge Cells.

Split Cells: Ek cell ko kai Rows ya Columns mein todne ke liye.
Process: Cell par Right Click -> Split Cells -> Set Rows/Columns -> OK.
Applying Built-In Table Styles

Apne table ko professional look dene ke liye Table Styles ka use karein:
- Table ke andar click karein.
- Table Design tab mein jayein.
- Table Styles group mein 'More' par click karke apni pasand ka design chunein.
Adding or Deleting Rows/Columns

Adjusting Sizes & Project

Resize: Column ya Row ki outline par mouse le jaakar click aur drag karein.

Mail – Merge (मेल – मर्ज)
Mail Merge is a powerful document merging facility in MS Word. Iska upyog ek hi letter ya document ko kai alag-alag logo ko turant bhejne ke liye kiya jata hai. Isse aap forms, letters, envelopes aur catalogs bahut tezi se bana sakte hain.
मेल मर्ज एमएस वर्ड की एक डॉक्यूमेंट मर्ज करने की सुविधा है जिसका उपयोग दो अलग-अलग फ़ाइलों से जानकारी को मर्ज करके फॉर्म, लेटर्स, मेलिंग लेबल, लिफाफे और कैटलॉग को जल्दी से बनाने के लिए किया जाता है।
- Creating Data Source: Receivers ki list banana.
- Creating Main Document: Common letter ya document likhna.
- Merging Files: Dono files ko aapas mein jodna.
Step 1: Creating Data Source (डेटा स्रोत बनाना)
Sabse pehle ek nayi blank file lein aur usme Receivers ki details (Name, Address, Contact) ke liye ek table banayein.
| Name | Address | Contact Number |
|---|---|---|
| Atul Roy | Patna | 9898353500 |
| Kaushik Das | Delhi | 9587585688 |
Note: Is file ko Save karein aur Close kar dein.
Step 2: Creating Main Document (मुख्य दस्तावेज बनाना)

Ek naya document kholen aur wo common letter type karein jo aap sabko bhejna chahte hain.
Step 3: Merging Document (मर्जिंग प्रोसेस)


Ant mein, Finish & Merge -> Edit Individual Documents -> OK par click karein. Aapke sabhi alag-alag letters taiyar ho jayenge.
Using Symbols and Characters
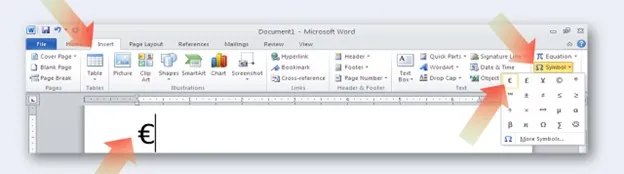
Apne document mein vishesh chihna (special characters) dalne ke liye Symbols ka use karein.
Process: Cursor ko wahan rakhein jahan symbol chahiye -> Insert Tab -> Symbol -> Apni pasand ka character chunein.
Using Shapes (आकृतियों का उपयोग)

Insert Shapes: Insert tab -> Shapes -> Kisi bhi shape par click karein aur page par mouse drag karke draw karein.
Shape Customization: Shape draw karne ke baad Format tab open hoga, jahan se aap color, size aur angle badal sakte hain. Shape ke andar likhne ke liye bas us par click karke type karna shuru karein.
Working with Picture (पिक्चर के साथ कार्य)
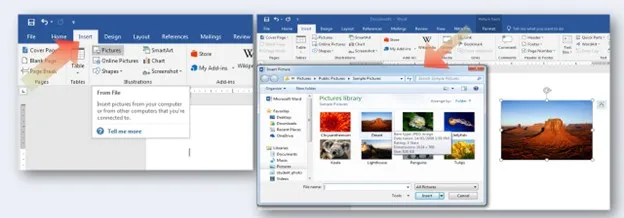
- Offline: Apne computer se photo dalne ke liye.
- Online: Internet se direct photo lane ke liye.
SmartArt & WordArt

SmartArt: Complex information ya process ko graphical diagram mein dikhane ke liye (Insert -> SmartArt).

WordArt: Text ko stylish aur decorative banante ke liye WordArt ka use karein.
Spelling and Grammar (स्पेलिंग और व्याकरण)

Document ki galtiyon ko pehchanne aur sudharne ke liye iska upyog hota hai. Lal line (Red underline) spelling ki galti aur Hari/Neeli line (Green/Blue underline) grammar ki galti darshati hai.
Process: Review Tab -> Spelling & Grammar. Suggestion box se sahi word chunein aur 'Change' par click karein.
Page Formatting (पेज फॉर्मेटिंग)
Document ko print karne se pehle uska setup karna bahut zaroori hai:
1. Document Margins: Page Layout Tab -> Margins. Page ke charo taraf ki khali jagah (White Space) set karne ke liye.

2. Page Orientation: Page Layout Tab -> Orientation.
- Portrait: Page khada (tall) dikhta hai.
- Landscape: Page leta hua (wide) dikhta hai.

3. Page Size: Page Layout Tab -> Size. Default roop se A4 size chuna jata hai jo standard printing ke liye hota hai.

Page Aesthetics (Borders & Color)

Page Border: Page ke charo taraf kinara lagane ke liye (Design Tab).

Page Color: Safed page ko rangin banane ke liye (Design Tab).
Apply Watermark in Page
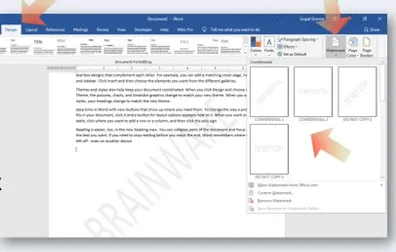
Apne document ki suraksha (protection) ke liye ya branding ke liye page ke peeche dhundhla text ya logo lagane ke liye Watermark ka use karein.
Process: Design Tab -> Watermark -> Custom Watermark (apna text likhne ke liye) ya predefined styles chunein.
Header, Footer & Page Number

- Header: Page ke sabse upar common jankari (jaise Book Title) dalne ke liye.
- Footer: Page ke sabse niche jankari (jaise Company Address) dalne ke liye.
- Page Number: Swachalit (automatic) page counting ke liye.
Page Break & Blank Page

Page Break: Kisi bhi point se naya page shuru karne ke liye (Ctrl + Enter).

Blank Page: Document mein kahin bhi beech mein khali page jodne ke liye.
Cover Page (कवर पेज)

Apne project ya report ko professional look dene ke liye pehle se bane huye Cover Page styles ka upyog karein (Insert -> Cover Page).
Creating Hyperlinks (Ctrl + K)

Hyperlinks ke jariye aap kisi text par click karke dusri file ya website par ja sakte hain.
Process: Text select karein -> Ctrl + K dabayein -> File ya Website ka Link dalen -> OK.
MS Word Smart Tips & Tricks (Pro Guide)
Agar aap MS Word ko ek expert ki tarah chalana chahte hain, to sirf basic commands kafi nahi hain. Niche diye gaye tips aapka ghanto ka kaam minto mein khatam kar denge.
1. Instant Horizontal Lines (Magic Shortcuts)
Word mein line khinchne ke liye aapko Insert Shapes mein jane ki zaroorat nahi hai. Bas ye keys 3 baar dabayein aur Enter karein:
- Plain Line: Dus baar hyphen --- dabayein aur Enter.
- Bold Line: Teen baar underscore ___ dabayein aur Enter.
- Dotted Line: Teen baar asterisk *** dabayein aur Enter.
- Double Line: Teen baar equals === dabayein aur Enter.
- Ziz-zag Line: Teen baar tilde ~~~ dabayein aur Enter.
2. Vertical Text Selection (Alt Key Magic)
Kya aapne kabhi socha hai ki text ko vertically (upar se niche) select kaise karein?
3. Format Painter (Copy Style, Not Text)
Agar aapne ek heading ko bahut accha design diya hai aur wahi design baaki headings par bhi chahiye, to Format Painter ka use karein.
4. Spike (Advance Cut & Paste)
Normal copy-paste mein aap ek baar mein ek hi cheez paste kar sakte hain. Lekin Spike se aap alag-alag jagah se text cut karke ek saath kahin bhi paste kar sakte hain.
- Cut to Spike: Ctrl + F3 (Jitni bar chahein alag-alag text cut karein).
- Paste from Spike: Ctrl + Shift + F3 (Saara cut kiya hua text ek saath paste ho jayega).
MS Word Master Shortcuts (A to Z Guide)
MS Word mein tezi se kaam karne ke liye niche diye gaye Ctrl + A to Z shortcuts ko yaad karna bahut zaroori hai. Yeh aapke ghanto ke kaam ko minto mein badal denge.
| Shortcut Key | Function (Action) |
|---|---|
| Ctrl + A | Select All (पूरे पेज को सेलेक्ट करें) |
| Ctrl + B | Bold (टेक्स्ट को मोटा करें) |
| Ctrl + C | Copy (कॉपी करें) |
| Ctrl + D | Font Options (फॉन्ट सेटिंग खोलें) |
| Ctrl + E | Center Align (टेक्स्ट को बीच में लाएं) |
| Ctrl + F | Find (कोई शब्द खोजें) |
| Ctrl + G | Go To (किसी खास पेज पर जाएं) |
| Ctrl + H | Replace (शब्द को बदलें) |
| Ctrl + I | Italic (टेक्स्ट को तिरछा करें) |
| Ctrl + J | Justify (दोनों तरफ से बराबर करें) |
| Ctrl + K | Insert Link (हाइपरलिंक जोड़ें) |
| Ctrl + L | Left Align (बाएं तरफ सेट करें) |
| Ctrl + M | Indent the Paragraph (पैराग्राफ खिसकाएं) |
| Ctrl + N | New Document (नया पेज लें) |
| Ctrl + O | Open (पुरानी फाइल खोलें) |
| Ctrl + P | Print (प्रिंट निकालें) |
| Ctrl + Q | Remove Formatting (फॉर्मेटिंग हटाएँ) |
| Ctrl + R | Right Align (दाएं तरफ सेट करें) |
| Ctrl + S | Save (फाइल सुरक्षित करें) |
| Ctrl + T | Hanging Indent (हैंगिंग इंडेंट) |
| Ctrl + U | Underline (नीचे लाइन खींचें) |
| Ctrl + V | Paste (पेस्ट करें) |
| Ctrl + W | Close Window (फाइल बंद करें) |
| Ctrl + X | Cut (हटाकर कॉपी करें) |
| Ctrl + Y | Redo (वापस लाएं) |
| Ctrl + Z | Undo (पीछे जाएं) |
अध्याय समाप्त - अब अपनी परीक्षा लें!
Aapne Microsoft Word ke sabhi mahatvapurna topics ko successfully padh liya hai. Ab check karein ki aapko kitna yaad hai.
Start MCQ Self Test