Microsoft Word 2021 is a Powerful word processing application
software that allows you to create a variety of documents, including
letters, resumes, and more.
माइक्रोसॉफ्ट
वर्ड 2021 एक शक्तिशाली वर्ड प्रोसेसिंग एप्लिकेशन सॉफ्टवेयर है जो आपको विभिन्न
प्रकार के दस्तावेज़(डॉक्यूमेंट) बनाने की अनुमति देता है, जिसमें पत्र, रिज्यूमे और बहुत कुछ शामिल हैं।
How to Open Ms-Word 2021 (Start Menu)
एमएस-वर्ड 2021 स्टर्ट मेनू के द्वारा कैसे खोलें
Open Start menu and type word, when Microsoft Word app icon will display, click over it
स्टार्ट मेनू खोलें और वर्ड टाइप करें, जब माइक्रोसॉफ्ट वर्ड ऐप आइकन दिखेगा , तो उस पर क्लिक करें
How to Open Ms-Word 2021 (Run Command)
एमएस-वर्ड 2021 रन कमांड के द्वारा कैसे खोलें
Press Win+R to open Run command Dialog Box then Type “WinWord” and press Enter key.
रन कमांड बॉक्स खोलने के लिए Win+R दबाएँ, फिर "WinWord"
टाइप करें और Enter Key दबाएँ।
The Word 2021 interface
When you open Word for the first time, the Start Screen will appear. From here, you'll be able to create a new document, choose a template, and access your recently edited documents. From the Start Screen, locate and select Blank document to access the Word interface.
Word 2021 इंटरफ़ेस
जब आप पहली बार Word खोलते हैं, तो स्टार्ट स्क्रीन दिखाई देगी. यहां से, आप एक नया डॉक्यूमेंट बना सकते हैं, एक टेम्पलेट चुन सकते हैं, और अपने हाल ही में एडिटिड डॉक्युमेंट्स तक पहुंच सकते हैं। स्टार्ट स्क्रीन से, Word इंटरफ़ेस तक पहुँचने के लिए ब्लैंक डॉक्यूमेंट को देखे और उसका चयन करें.
Microsoft Word 2021 Screen Components
The Quick Access Toolbar
The Quick Access Toolbar lets you access common commands no matter which tab is selected. By default, it includes the Save, Undo, and Redo commands
क्विक एक्सेस टूलबार
क्विक एक्सेस टूलबार आपको सामान्य आदेशों तक पहुंचने देता है, इससे कोई फर्क नहीं पड़ता कि कौन सा टैब चुना गया है। डिफ़ॉल्ट रूप से, इसमें सेव, अन्डू और रीडो आदेश शामिल हैं।
The Tell Me bar
Tell Me bar
The Tell me bar allows you to search for commands, which is especially helpful if you don't remember where to find a specific command.
टेल मी बार
टेल मी बार आपको कमांड की खोज करने की अनुमति देता है, जो विशेष रूप से सहायक है यदि आपको याद नहीं है कि एक विशिष्ट कमांड कहां मिलेगा।
The Ribbon
The Ribbon contains all of the commands you will need to perform common tasks in Word. It has multiple tabs, each with several groups of commands.
रिबन
रिबन में वे सभी आदेश होते हैं जिनकी आपको Word में सामान्य कार्य करने के लिए आवश्यकता होगी. इसमें कई टैब हैं, जिनमें से प्रत्येक में कमांड के कई समूह हैं।
Showing and hiding the Ribbon
If you find that the Ribbon takes up too much screen space, you can hide it. To do this, click the Ribbon Display Options arrow in the upper-right corner of the Ribbon, then select the desired option from the drop-down menu:
रिबन दिखाना और छिपाना
यदि आप पाते हैं कि रिबन बहुत अधिक स्क्रीन स्पेस लेता है, तो आप इसे छिपा सकते हैं। ऐसा करने के लिए, रिबन के ऊपरी-दाएँ कोने में रिबन डिस्प्ले ऑप्शन के एरो पर क्लिक करें, फिर ड्रॉप-डाउन मेनू से अपनी इच्छा के विकल्प का चयन करें:
Options in ribbon display
Auto-hide Ribbon: Auto-hide displays your document in full-screen mode and completely hides the Ribbon from view. To show the Ribbon, click the Expand Ribbon command at the top of the screen.
Show Tabs: This option hides all command groups when they're not in use, but tabs will remain visible. To show the Ribbon, simply click a tab.
Show Tabs and Commands: This option maximizes the Ribbon. All of the tabs and commands will be visible. This option is selected by default when you open Word for the first time.
रिबन डिस्पले में निम्नलिखित ऑपसन होते है
ऑटो-हाइड रिबन: ऑटो-हाइड आपके डॉक्यूमेंट को पूर्ण-स्क्रीन मोड में दिखाता है और रिबन को दिखने से पूरी तरह से छुपाता है। रिबन दिखाने के लिए, स्क्रीन के ऊपर पर इक्स्पैन्ड रिबन आदेश क्लिक करें.
शो टैब : यह विकल्प सभी कमांड समूहों को छुपाता है जब वे उपयोग में नहीं होते हैं, लेकिन टैब दिखाई देते रहेंगे। रिबन दिखाने के लिए, बस एक टैब पर क्लिक करें।
शो टैब्स एण्ड कमांडस : यह विकल्प रिबन को अधिकतम करता है. सभी टैब और कमांड दिखाई देंगे। जब आप पहली बार Word खोलते हैं, तो यह विकल्प डिफ़ॉल्ट रूप से चयनित होता है.
Command Groups

Each group contains a series of different commands. Simply click any command to apply it. Some groups also have an arrow in the bottom-right corner, which you can click to see even more commands.
कमांड ग्रूप
प्रत्येक समूह में विभिन्न आदेशों की एक श्रृंखला होती है। बस इसे लागू करने के लिए किसी भी आदेश पर क्लिक करें। कुछ समूहों में निचले-दाएं कोने में एक तीर भी होता है, जिसे आप और भी कमांड देखने के लिए क्लिक कर सकते हैं।
The Ruler
The Ruler is located at the top and to the left of your document. It makes easier to make alignment and spacing adjustments. Click on View Tab Ruler to show hide ruler.
रूलर
रूलर आपके डॉक्यूमेंट के ऊपर और बाईं ओर स्थित है। यह किसी भी चीज को एक सीध मे लगाना और स्पेस अजस्ट करना आसान बनाता है। रूलर को दिखाने और छिपाने के लिए व्यू टैब पर क्लिक करें।
Document Pane
This is where you'll type and edit text in the document.
डॉक्यूमेंट पेन
यह वह जगह है जहाँ आप डॉक्यूमेंट में टेक्स्ट लिखेंगे और एडिट करेंगे।
The Document views bar
Document Views
There are three ways to view a document:
Read Mode displays your document in full-screen mode.
Print Layout is selected by default. It shows the document as it would appear on the printed page.
Web Layout shows how your document would look as a webpage.
डॉक्यूमेंट व्यू
डॉक्यूमेंट को देखने के तीन तरीके हैं:
रीड मोड आपके डॉक्यूमेंट को पूर्ण-स्क्रीन मोड में दिखाता है.
प्रिन्ट लेआउट डिफ़ॉल्ट रूप से चयनित है. यह डॉक्यूमेंट को वैसा दिखाता है जैसा यह प्रिंटेड पेज पर दिखाई देगा।
वेब लेआउट दिखाता है कि आपका डॉक्यूमेंट वेबपेज के रूप में कैसा दिखेगा.
The Zoom bar
Zoom Control
Click and drag the slider to use the zoom control. The number to the right of the slider bar reflects the zoom percentage
ज़ूम बार
ज़ूम कंट्रोल
ज़ूम नियंत्रण का उपयोग करने के लिए स्लाइडर को क्लिक करें और खींचें. स्लाइडर बार के दाईं ओर की संख्या ज़ूम प्रतिशत को दर्शाती है।
The Status Bar
Status Bar locate at the bottom of document. Cursor movement and character status are shown here. You can also find the CAPS Lock status and Number Lock status here.
स्टैटस बार
स्टैटस बार डॉक्यूमेंट के निचले भाग में स्थित है. कर्सर मूवमेंट और कैरिक्टर स्टैटस यहाँ दिखाई देता है । आप यहां कैप्स लॉक स्टैटस और नंबर लॉक स्टैटस भी पा सकते हैं।
Backstage view
Backstage view gives you various options for saving, opening a file, printing, and sharing your document. To access Backstage view, click the File tab on the Ribbon.
बैकस्टेज व्यू
बैकस्टेज व्यू आपको अपने डॉक्यूमेंट को सेव करने, फ़ाइल खोलने, प्रिन्ट करने और शेयर करने के लिए विभिन्न विकल्प देता है। बैकस्टेज व्यू तक पहुँचने के लिए, रिबन पर फ़ाइल टैब क्लिक करें
Backstage view options
1. Return to Word
You can use the arrow to close Backstage view and return to Word.
बैकस्टेज व्यू बंद करने और Word पर लौटने के लिए आप तीर का उपयोग कर सकते हैं.
2. Info
The information pane will appear whenever you access Backstage view. It contains information on the current document. You can also inspect the document to remove personal info and protect it to keep others from making further changes.
जब भी आप बैकस्टेज व्यू पर पहुँचते हैं, तो जानकारी पेन प्रकट होगा. इसमें वर्तमान डॉक्यूमेंट की जानकारी होती है। आप व्यक्तिगत जानकारी को हटाने के लिए डॉक्यूमेंट का निरीक्षण भी कर सकते हैं और दूसरों को आगे परिवर्तन करने से रोकने के लिए इसे सुरक्षित कर सकते हैं।
3. New
From here, you can create a new blank document, or you can choose from a large selection of templates.
यहां से, आप एक नया रिक्त डॉक्यूमेंट बना सकते हैं, या आप टेम्पलेट्स के एक बड़े चयन से चुन सकते हैं।
4. Open
From here, you can open documents saved to your computer or to your OneDrive.
यहाँ से, आप अपने कंप्यूटर या अपने OneDrive पर सहेजे गए डॉक्यूमेंट खोल सकते हैं.
5. Save and Save As
You'll use Save and Save As to save documents to your computer or your OneDrive.
आप डॉक्यूमेंट को अपने कंप्यूटर या अपने OneDrive पर सेव करने के सेव एजऔर सेव का उपयोग करेंगे.
6. Print
From the Print pane, you can change the print settings and print your document. You can also see a preview of your document.
प्रिन्ट pane से, आप प्रिन्ट सेटिंग्स परिवर्तित कर सकते हैं और अपना डॉक्यूमेंट प्रिन्ट कर सकते हैं. आप अपने डॉक्यूमेंट का पूर्वावलोकन भी देख सकते हैं.
7. Share
From here, you can invite people to view and collaborate on your document.
यहां से, आप लोगों को अपने डॉक्यूमेंट को देखने और उस पर सहयोग करने के लिए आमंत्रित कर सकते हैं.
8. Export
From here, you can export your document in another file format, such as PDF/XPS.
यहां से, आप अपने डॉक्यूमेंट को किसी अन्य फ़ाइल प्रारूप में निर्यात कर सकते हैं, जैसे कि PDF/XPS.
9. Close
Click here to close the current document.
वर्तमान डॉक्यूमेंट को बंद करने के लिए यहाँ क्लिक करें.
10. Account
From the Account pane, you can access your Microsoft account information, modify your theme and background, and sign out of your account.
अकाउंट pane , आप अपनी Microsoft अकाउंट जानकारी तक पहुँच सकते हैं, अपनी थीम और बैकग्राउंड बदल सकते हैं, और अपने अकाउंट से साइन आउट कर सकते हैं.
11. Options
Here, you can change various Word options. For example, you can control the spelling and grammar check settings, Auto Recover settings, and language preferences.
यहां, आप विभिन्न वर्ड विकल्पों को बदल सकते हैं। उदाहरण के लिए, आप स्पेलिंग और व्याकरण जाँच सेटिंग्स, स्वत: पुनर्प्राप्त सेटिंग्स और भाषा वरीयताओं को नियंत्रित कर सकते हैं.
Check Point-1
- Open Word 2019, and create a blank document.
- Change the Ribbon Display Options to Show Tabs.
- Using Customize Quick Access Toolbar, add New, Quick Print, and Spelling & Grammar.
- In the Tell me bar, type Shape and press Enter.
- Choose a shape from the menu, and double-click somewhere on your document.
- Show the Ruler if it is not already visible.
- Zoom the document to 120%.
- Change the Document view to Web Layout.
- Change the Ribbon Display Options back to Show Tabs and Commands, and change the Document View back to Print Layout.
चेक पॉइंट-1
- Word 2019 खोलें, और एक ब्लैंक डॉक्यूमेंट लें।
- रिबन डिस्प्ले ऑप्शन को शो टैब मे बदले .
- कस्टमाइज़ क्विक एक्सेस टूलबार का उपयोग करके नया, क्विक प्रिन्ट और स्पेलिंग एण्ड ग्रामर ऑप्सन को जोड़ें.
- टेल मी बार में शेप लिखें और Enter दबाएँ.
- मेनू से कोई शेप चुनें और अपने डॉक्यूमेंट पर कहीं डबल-क्लिक करें.
- रूलर को दिखाएं यदि यह पहले से दिखाई नहीं दे रहा हो।
- डॉक्यूमेंट को 120% तक ज़ूम करें।
- डॉक्यूमेंट व्यू को वेब लेआउट में बदलें.
- रिबन डिस्प्ले ऑप्शन को शो टैब एण्ड कमांड में वापस बदलें और डॉक्यूमेंट व्यू को वापस प्रिन्ट लेआउट में बदलें.
What is document?
Word files are called documents. Whenever you start a new project in Word, you'll need to create a new document, which can either be blank or from a template.
Ms-word 2019 file extension is “.docx” for document.
डॉक्यूमेंट क्या है ?
Word के फ़ाइलों को डॉक्यूमेंट कहा जाता है. जब भी आप Word में कोई नया प्रोजेक्ट प्रारंभ करते हैं, तो आपको एक नया दस्तावेज़ बनाना होगा, जो या तो ब्लेंक या टेम्पलेट से हो सकता है.
Ms-Word 2019 फ़ाइल एक्सटेंशन डॉक्यूमेंट के लिए ".docx" होता है।
To create a new document:
1. From Blank Document
Select the File tab to access Backstage view.
Select New, then click Blank document.
2. From a template document
Click the File tab to access Backstage view, then select New then select a template
You can also use Search to find a template from online.
नया डॉक्यूमेंट बनाने के लिए:
1. ब्लैंक डॉक्यूमेंट से
बैकस्टेज व्यू तक पहुँचने के लिए फ़ाइल टैब का चयन करें।
नया चुनें, ब्लैंक डॉक्यूमेंट पर क्लिक करें.
2. टेम्पलेट डॉक्यूमेंट से
बैकस्टेज व्यू तक पहुँचने के लिए फ़ाइल टैब क्लिक करें, फिर नया चुनें और फिर टेम्पलेट का चयन करें
आप ऑनलाइन से टेम्पलेट खोजने के लिए सर्च का भी उपयोग कर सकते हैं।
Create Sample Data
Type =rand()
Press Enter. Some paragraphs appear in your document
सेम्पल डेटा बनाना
लिखें =rand()
उसके बाद Enter दबाएँ. आपके पेज में पहले से लिखी हुई कुछ अनुच्छेद
नजर आने लगेंगी.
नोटः- कोष्टक में उतनी संख्या लिखे जितनी आपको अनुच्छेद चाहिए। जैसे अगर आपको 10 अनुच्छेद चाहिए तो आप टाइप करें =rand(10) फिर इंटर दबायें।
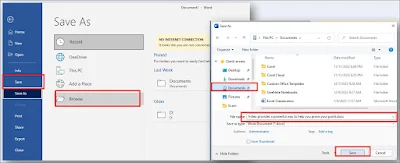
How to Save a file
फाइल सेव कैसे करें
Click on File > save > browse > Choose your file location and type a name for your file > save
Cursor Movement
कर्सर नियंत्रण
|
KEYSTROKE
|
CURSOR
ACTION
|
|
HOME
|
Beginning of the line
लाइन
के शुरुआत में
|
|
END
|
End of the line
लाइन
के अंत में
|
|
CTRL+HOME
|
Top of the document
डॉक्यूमेंट के सबसे शुरू में
|
|
CTRL+END
|
End of the document
डॉक्यूमेंट
के सबसे अंत में
|
|
Selection
चयन
|
Technique
तकनीक
|
|
Whole word
पूरा
शब्द
|
Double click within the word
शब्द
के भीतर डबल क्लिक करें
|
|
Whole paragraph
पूरा
अनुच्छेद
|
Triple click within the paragraph
पैराग्राफ
के भीतर तीन बार क्लिक करें
|
|
Several words or lines
कई
शब्द या पंक्तियाँ
|
Drag the mouse over the words or hold down SHIFT while
using the arrow keys
माउस को
शब्दों पर खींचें या SHIFT दबाए रखें Arrow key का उपयोग करते समय
|
|
Entire document
संपूर्ण
दस्तावेज़
|
CTRL+A or triple click on left margin area.
बाएं
मार्जिन क्षेत्र पर CTRL + A या तीन बार क्लिक करें।
|
Font Group
Font Group Tools Detail
फॉन्ट समूह के टूल की जानकारी
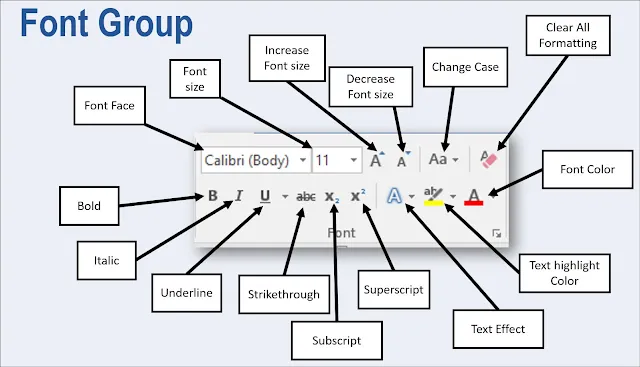
Font (Ctrl +Shft + F) : To Change Font Face. Choose Different Font face to give a different look of your document’s font.
फ़ॉन्ट फेस बदलने के लिए. अपने दस्तावेज़ के फ़ॉन्ट का एक अलग रूप देने के लिए अलग अलग फ़ॉन्ट फेस चुनें.
Font Size (Ctrl +Shft + P) , Increase Font Size फ़ॉन्ट आकार बढ़ाएँ (Ctrl + shift +>) and Decrease font Size फ़ॉन्ट आकार घटाएँ
(Ctrl +shift+<) : To change Font Size. फ़ॉन्ट आकार बदलने के लिए.
Change Case :To change the case of selected text As चयनित शब्द के केस को बदलने के लिए
1. Sentence case. 2. lowercase. 3. UPPERCASE.
4. Capitalize Each Word. 5. tOGGLE cASE.
Clear All Formatting: To clear all formatting (such as bold, underline, italics, color, superscript, subscript, and more) from your text and return your text to its default formatting styles.अपने टेक्स्ट से सभी स्वरूपण (जैसे बोल्ड, अन्डरलाइन , इटैलिक, रंग, सुपरस्क्रिप्ट, सबस्क्रिप्ट, और अधिक) साफ़ करने के लिए और अपने लिखावट को उसकी डिफ़ॉल्ट सेटिंग में वापस करें.
Bold (Ctrl + B) : To make your text bold. अपने टेक्स्ट को बोल्ड बनाने के लिए।Italic (Ctrl + i): To make your text Italic. अपने टेक्स्ट को इटैलिक बनाने के लिए।
Underline ( Ctrl + U ) : To underline your text. अपने टेक्स्ट को रेखांकित करना।Click dropper to choose different underline style and underline Color.
विभिन्न रेखांकन शैली और रेखांकन रंग चुनने के लिए ड्रॉपर पर क्लिक करें.
Strikethrough: To make a cross line over text. टेक्स्ट पर एक क्रॉस लाइन बनाने के लिए
Subscript (Ctrl + =) and Superscript (Ctrl + Shift + +): To format your text like subscript or superscript अपने टेक्स्ट को स्वरूपित करने के लिए जैसे सबस्क्रिप्ट या सुपरस्क्रिप्ट
Text Effects and Typography : To apply predefined text effect.पूर्वनिर्धारित टेक्स्ट इफेक्ट लागू करने के लिए
Text highlight Color : To make highlight over text. टेक्स्ट पर हाइलाइट बनाना। Click Dropper to choose different Color for highlight text. Choose None to remove text highlight effect form selected text.
हाइलाइट टेक्स्ट के लिए अलग अलग रंग चुनने के लिए ड्रॉपर पर क्लिक करें. चुने हुए टेक्स्ट से हाइलाइट प्रभाव निकालने के लिए नन ऑप्शन चुनें.
Font Color : To change font Color. फ़ॉन्ट रंग बदलने के लिए.
Type and format as given bellow
नीचे दिए गए अनुसार लिखे और फॉर्मैट करे
Paragraph group
पैराग्राफ ग्रुप
Paragraph group and their tools
पैराग्राफ ग्रुप और उनके टूल्स
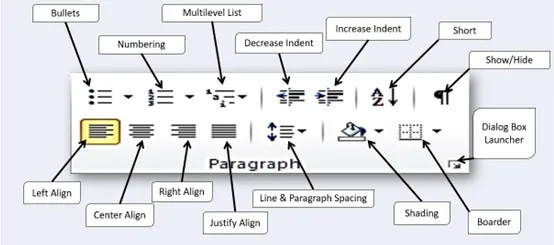
Bullets, Numbering and Multilevel list : To Use Bullets, Numbering and Multilevel list over paragraph.पैराग्राफ पर बुलेट, नंबरिंग और मल्टीलेवल सूची का उपयोग करने के लिए।
Increase Indent (Tab ) and Decrease Indent (Shft + Tab) : To make Indent effect over paragraph. Click on Group launcher for more Indent type like Hanging, First line indent, right indent
पैराग्राफ पर इंडेंट लगाना । हैंगिंग, फर्स्ट लाइन इंडेंट, राइट इंडेंट जैसे अधिक इंडेंट प्रकार के लिए ग्रुप लॉन्चर पर क्लिक करें
Show/Hide : To show/hide paragraph marks and other hidden formatting symbols like line break, column break, character spacing symbols etc. पैराग्राफ के चिह्नों और अन्य छिपे हुए फॉर्मैट सिम्बल जैसे लाइन ब्रेक, कॉलम ब्रेक, वर्ण रिक्ति प्रतीकों आदि को दिखाना/छुपाना
Short : To arrange current selection in alphabetical or numerical order. Best for arrange date in a table format.वर्तमान चयन को ऐल्फबेटिकल या न्यूमेरिकल क्रम में व्यवस्थित करना। टेबल फॉर्मैट में दिनांक व्यवस्थित करने के लिए सबसे अच्छा है।
Left align (Ctrl + L), Center align (Ctrl+ E), Right align (Ctrl + R) and Justify align (Ctrl +J) : To align text left or right, center text or justify text on a page.टेक्स्ट को बाएँ या दाएँ संरेखित करने के लिए, टेक्स्ट को बीच में रखना या किसी पृष्ठ पर टेक्स्ट को सही से रखना .
Line and Paragraph Spacing : To Make space between Line and paragraph. लाइन और पैराग्राफ के बीच जगह बनाना.
Single line spacing (Ctrl + 1), Double line Spacing
(Ctrl + 2), One and Half line spacing (Ctrl + 5) ,
Space before paragraph (Ctrl + 0),
Shading : To Change the color behind the selected text, paragraph or table cell.चयनित टेक्स्ट, पैराग्राफ या टेबल सेल के पीछे का रंग परिवर्तित करना.
Borders : To Add or remove borders from your selection. Use dropper to more option.अपने चयन से बॉर्डर लगाना या हटाना . अधिक विकल्प के लिए ड्रॉपर का उपयोग करें।
Tabs setting
टैब सेटिंग
It is a very useful and handy tool to arrange and manipulate your data in table or columnar format. यह टेबल या कॉलम में अपने डाटा को सजाने या व्यवस्थित करने के लिए एक बहुत ही उपयोगी और आसान उपकरण है।
Types of Tabs
टैब के प्रकार
Left(Normal) : With the left tab, text will begin at the tab position and continue to the right of the tab
बाएं टैब के साथ, टेक्स्ट टैब पोजिसन से शुरू होगा और टैब के दाईं ओर जारी रहेगा।
With the right tab, text will end at the tab and flow to the left
दाएं टैब के साथ, टेक्स्ट टैब पर समाप्त होगा और बाईं ओर जाएगा ।
The center tab works similar to centering a line of text but instead of centering between margins text is centered at the tab location.
सेंटर टैब टेक्स्ट की एक पंक्ति को सेंटर में रखने के समान काम करता है, लेकिन मार्जिन के बीच केंद्रित होने के बजाय, टेक्स्ट टैब लोकैशन पर केंद्रित होता है।
The decimal tab is used to align numbers and text with a period (.). This is useful for a group of numbers or a list of instructions.
दशमलव टैब का उपयोग संख्याओं और टेक्स्ट को अवधि (.) के साथ सीध में लगाने के लिए किया जाता है. यह संख्याओं के समूह या निर्देशों की सूची के लिए उपयोगी है।
The bar tab is used to add a vertical line at that position.
बार टैब का उपयोग उस लोकैशन में एक ऊर्ध्वाधर रेखा जोड़ने के लिए किया जाता है।
Project on Paragraph group and Tab settings
पैराग्राफ ग्रुप एवं टैब सेटिंग पर प्रोजेक्ट
Working with Styles
स्टाइल के साथ काम करना
Style is use to quickly format your paragraph with a predefine format like Title, Heading etc.
1. Select a Paragraph to format with style option
2. Choose a style from home tab in Style group
स्टाइल का उपयोग टाइटल, हेडिंग आदि जैसे पूर्वनिर्धारित फॉर्मैट के साथ आपके पैराग्राफ को जल्दी से फॉर्मैट करने के लिए किया जाता है।
1. स्टाइल विकल्प के साथ फॉर्मैट करने के लिए एक पैराग्राफ का चयन करें
2. स्टाइल समूह में एक स्टाइल होम टैब से चुनें
Table
टेबल
A table is structure of Grid. Where Vertical are column and Horizontal are Row and the Intersection of row and column is known as a cell.
एक तालिका ग्रिड की संरचना है। जहां ऊर्ध्वाधर स्तंभ हैं और क्षैतिज पंक्ति हैं और पंक्ति और स्तंभ एक दूसरे को काटते हैं सेल के रूप में जाना जाता हैं ।
There are four basic method to create table in Microsoft word.
बेसिकली माइक्रोसॉफ्ट वर्ड में टेबल तिन तरिकों से बनाये जा सकते हैं
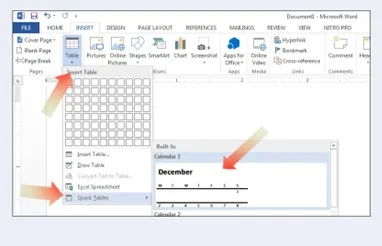
Creating a Table (Quick Tables):
Place the insertion point where you want the table to appear
1. Insert Tab
2. Tables
3. Quick Tables
4. Choose a table
टेबल बनाना (क्विक टेबल मेथड ):
कर्सर को उस स्थान पर रखें जहाँ आप टेबल को दिखाना चाहते हैं
1. इन्सर्ट टैब पे किल्क करें
2. टेबल पे किल्क करें
3. क्विक टेबल पे किल्क करें
4. कोई टेबल चुनें
Creating a Table (Drag Option):
Place the insertion point where you want the table to appear
Insert Tab -> Tables -> Drag over grid
टेबल बनाना (ड्रैग विकल्प):
सम्मिलन बिंदु को उस स्थान पर रखें जहाँ आप टेबल को दिखाना चाहते हैं
इन्सर्ट टैब -> टेबल -> ग्रिड पर खींचें
Creating a Table (Insert Option):
Place the insertion point where you want the table to appear
Insert Tab -> Table -> Insert Table
Type a value for row and column and Click on OK button
टेबल बनाना (इन्सर्ट विकल्प ):
सम्मिलन बिंदु को उस स्थान पर रखें जहाँ आप तालिका को दिखाना चाहते हैं
इन्सर्ट टैब -> टेबल -> टेबल इन्सर्ट करे
रो और कॉलम के लिए एक मान टाइप करें और ओके बटन पर क्लिक करें
Creating a Table (Draw Option):
Click on Insert tab -> table -> Draw Table
Now your Mouse Pointer look like a Pencil.
Click and Drag over page to draw your desirer Table Structure.
टेबल बनाना (ड्रा विकल्प):
इन्सर्ट टैब पर क्लिक करें -> टेबल -> ड्रॉ टेबल
अब आपका माउस पॉइंटर एक पेंसिल की तरह दिखता है।
अपनी इच्छा अनुसार टेबल बनाने के लिए पेज पर क्लिक करे और खिचे।
Navigating within a Table Using Keys
You can use the keyboard to navigate through your table.
कीबोर्ड के किज का उपयोग करके टेबल के भीतर नेविगेट करना
आप अपनी टेबल मे नेविगेट करने के लिए कीबोर्ड का उपयोग कर सकते हैं।
|
To Move to…
|
Press….
|
|
Next cell
|
Tab or Right Arrow
|
|
Previous cell
|
Shift + Tab or Left Arrow
|
|
Next row
|
Down Arrow
|
|
Previous row
|
Up Arrow
|
|
Add a tab for alignment within a cell
|
Ctrl + Tab
|
|
First Cell in a row
|
Alt + Home
|
|
Last cell in a row
|
Alt + End
|
|
First cell in a column
|
Alt + Page Up
|
|
Last cell in a column
|
Alt + Page Down
|
Merging Cells in a table
Select the cells you want to merge
Right click within the selected cells then select Merge Cells
The selected cells are merged.
टेबल मे सेल्स को मर्ज करना
उन सेल्स का चयन करें जिन्हें आप मर्ज करना चाहते हैं
चयनित सेल्स में राइट क्लिक करें, फिर मर्ज सेल्स का चयन करें
चुने हुए सेल्स को मर्ज कर दिया जाता है.
Splitting Cells in a table
Select the cells you want to Split.
Right click within the selected cells then select Split Cells…
The Split Cells dialog box appears, Set Number of column and row
Then click OK, Cell will split according to your settings.
टेबल में सेल्स को स्पिलिट करना
उन सेल्स का चयन करें जिन्हें आप स्पिलिट करना चाहते हैं.
चुने हुए सेल्समें राइट क्लिक करें, फिर स्प्लीट सेल्स का चयन करें...
स्प्लीट सेल डाइलॉग बॉक्स नजर आने लगेगा, कॉलम और रॉ की संख्या सेट करें फिर ओके पर क्लिक करें, सेल आपकी सेटिंग्स के अनुसार स्प्लीट हो जाएगा।
Applying Built-In Table Styles (Formatting Table)
Place the insertion point inside your table.
From the Design tab, in the Table Styles group click MORE
The Table Style scroll box appears.
To determine which aspects of the style are applied to your table
बिल्ड-इन टेबल स्टाइल लगाना( टेबल फोर्मेटिंग)
इन्सर्ट पॉइंट को अपनी टेबल के अंदर रखें।
डिज़ाइन टैब से, टेबल स्टाइल ग्रुप में more पर क्लिक करें
टेबल स्टाइल स्क्रॉल बॉक्स आता है।
यह निर्धारित करने के लिए कि स्टाइल के कौन से पहलू आपकी टेबल पर लागू होते हैं
Adding Rows, Columns, or Cell
Right click in the cell where you want to Insert Columns or Row or Cell
Click on Insert then column, row or cell, that you need
रॉ, कॉलम और सेल जोड़ना
उस सेल में राइट क्लिक करें जहाँ आप कॉलम या रॉ या सेल जोड़ना चाहते हैं
तब इन्सर्ट कॉलम, रॉ या सेल पर क्लिक करें, जिसकी आपको आवश्यकता है
Deleting Rows, Columns
Select the Row or Column that you want to delete
Right click on that selected row or column
Select Delete Column/Row.
रॉ, कॉलम को हटाना
उस रॉ या कॉलम का चयन करें जिसे आप हटाना चाहते हैं
उस चयनित रॉ या कॉलम पर राइट क्लिक करें
डिलीट कॉलम/रॉ चुने

Adjusting Column and Row Sizes
Click hold and drag mouse on column or row outline to resize them
कॉलम और रॉ का साइज़ एडजेस्ट करना
कॉलम या रॉ के आउट्लाइन पर माउस दबाए रखें और खींचें ताकि उनका आकार बदला जा सके
Mail – Merge
Mail Merge is a document merging facility of MS Word that is used to quickly create forms, letters, mailing labels envelops, and catalogs by merging the information from two different files.
Merging required three steps
Creating Data Source ( Name List )
Creating Main Document( Letters, Envelops, mailing labels etc.)
Merging of two files ( Data source and Main Document)
मेल – मर्ज
मेल मर्ज एमएस वर्ड की एक डॉक्यूमेंट मर्ज सुविधा है जिसका उपयोग दो अलग-अलग फ़ाइलों से जानकारी को मर्ज करके फॉर्म, लेटर्स, मेलिंग लेबल लिफाफे और कैटलॉग को जल्दी से बनाने के लिए किया जाता है।
मर्ज के लिए तीन स्टेप्स की जरूरत है
- डेटा स्रोत बनाना (नाम सूची)
- मुख्य दस्तावेज़ बनाना (पत्र, लिफाफे, मेलिंग लेबल आदि)
- दो फ़ाइलों को मर्ज करना (डेटा स्रोत और मुख्य दस्तावेज़)
|
Name
|
Address
|
Contact Number
|
|
Atul Roy
|
Patna
|
9898353500
|
|
Kaushik Das
|
Delhi
|
9587585688
|
|
Ramkrishnan
|
Punjab
|
8879359686
|
|
Abhijit Sharan
|
Delhi
|
8596855356
|
|
Anish Sekh
|
Kolkata
|
7858586869
|
Step 1:- Creating Data Source
Open a new blank document.
Insert a table as below and fill the data.
Save this file
Close this file
स्टेप 1:- डेटा स्रोत बनाना
कोई नया रिक्त दस्तावेज़ खोलें.
नीचे दी गई टेबल डालें और डेटा भरें।
इस फ़ाइल को सेव करें
इस फ़ाइल को बंद करें
Step 2:- Creating Main Document
Open a new blank document.
Type bellow letter for create mail merge.
स्टेप 2: - मुख्य दस्तावेज़ बनाना
कोई नया रिक्त दस्तावेज़ खोलें.
मेल मर्ज बनाने के लिए नीचे का लेटर लिखें.
Step 3:- Merging Document
स्टेप 3: – मर्ज डॉक्यूमेंट
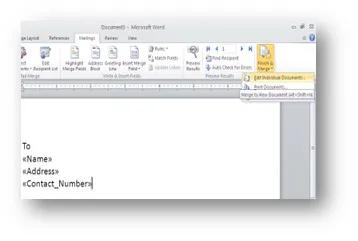
Mailings tab --> Select Recipients --> Use Exiting List -->
Insert Merge Field
Mailings Tab --> Finish & Merge --> Edit Individual Document --> ok

Using Symbols and Characters
Place your cursor in the document where you want to insert Symbols
Click on Insert Tab --> Symbol
Choose the symbols or character that you want
सिम्बल और कैरिक्टर का उपयोग करना
अपने कर्सर को उस जगह में रखें जहाँ आप सिम्बल इन्सर्ट करना चाहते हैं
इन्सर्ट टैब पर क्लिक करे --> सिम्बल
अपनी पसंद का कैरिक्टर या सिम्बल चुने
Example of Symbol and Equation
सिम्बल और समीकरण का उदाहरण
Using Shapes
To create shapes in word click on
Insert tab
Click on shapes tool in Illustration Group
Click on any shapes that you want to draw in your page.
Left Click hold and drag mouse over the page where you want to draw the shapes
शैप का उपयोग करना
Word में शैप बनाने के लिए क्लिक करें
इन्सर्ट टैब
इलस्ट्रैशन ग्रुप में शैप टूल पर क्लिक करें
उन शैप पर क्लिक करें जिन्हें आप अपने पेज मे बनाना चाहते हैं.
बाएँ क्लिक करें दबाए रखें और माउस को उस पेज पर खींचें जहाँ आप शैप बनाना चाहते हैं
Shape Customization
You can customize your shape color, size, angel etc. from format tab.
To customize a shape click on that shape then choose your desire tool to customize. To add text on shapes , click on shape then type from keyboard.
शैप को कस्टमाइज़ करना
आप अपने शैप का रंग, आकार, ऐंगल आदि कस्टमाइज़ कर सकते हैं। फॉर्मैट टैब से.
किसी शैप को कस्टमाइज़ करने के लिए, उस शैप पर क्लिक करें, फिर कस्टमाइज़ करने के लिए अपनी इच्छा का टूल चुनें। शैप पर टेक्स्ट जोड़ने के लिए, शैप पर क्लिक करें और फिर कीबोर्ड से टाइप करें.
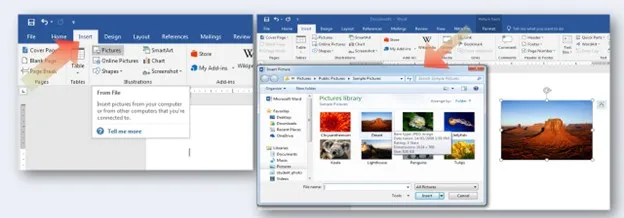
Working with Picture
MS-Word provide two way to insert Image or Picture in your document.
Offline : Insert Picture or Image from Your PC storage.
Online : Insert Picture from Internet.
पिक्चर के साथ कार्य करना
MS-Word आपके दस्तावेज़ में इमेज या पिक्चर लाने के दो तरीके प्रदान करता है.
ऑफ़लाइन: अपने PC स्टोरेज से इमेज या पिक्चर लायें .
ऑनलाइन: इंटरनेट से पिक्चर लायें.
Picture customization
Use Format tab to customize your Picture like Picture Style, Shape, Color etc.
To activate format tab click on your Image or Picture or shape
पिक्चर कस्टमाइज़ करना
अपने पिक्चर को कस्टमाइज़ करने के लिए फॉर्मैट टैब का उपयोग करें जैसे पिक्चर स्टाइल, आकार, रंग आदि.
इन्सर्ट टैब को ऐक्टवैट करने के लिए अपनी इमेज या पिक्चर या शैप पर क्लिक करें
Using Smart Art
Click on Insert Tab --> Smart Art
The Choose a SmartArt Graphic dialog box will appear, choose a SmartArt then click ok.
स्मार्ट आर्ट का उपयोग करना
इन्सर्ट टैब पर क्लिक करें --> स्मार्ट आर्ट
कोई स्मार्टआर्ट ग्राफ़िक चुनें डाइलॉग बॉक्स दिखाई देगा, कोई SmartArt चुनें फिर ओके क्लिक करें.
Using WordArt
Click on Insert Tab --> Word Art
Choose a style from dropped list of Word Art.
WordArt का उपयोग करना
इन्सर्ट टैब पर क्लिक करें --> वर्ड आर्ट
वर्ड आर्ट की ड्रॉप की गई सूची से एक स्टाइल चुनें।
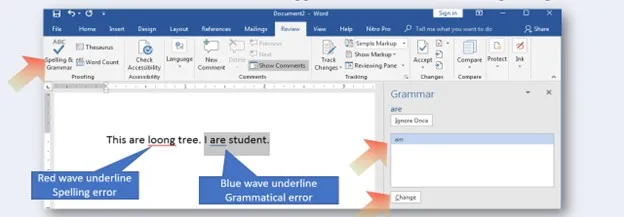
Spelling and Grammar
To Check the spelling and grammar of a document.
Click on Review Tab --> Spelling & Grammar
Choose correct word from suggestions list box then change or Ignore
स्पेलिंग और व्याकरण
किसी डॉक्यूमेंट के स्पेलिंग और व्याकरण की जाँच करना.
रिव्यू टैब पर क्लिक करें --> स्पेलिंग और व्याकरण
Suggestion लिस्ट बॉक्स से सही शब्द चुने, फिर बदलें या अनदेखा करें.
Page Formatting
Document Margins
Click on Page Layout Tab --> Margins
Choose from default margins or choose custom Margins to set margin as you wish.
डॉक्यूमेंट मार्जिन
पेज लेआउट टैब पर क्लिक करें --> मार्जिन
डिफ़ॉल्ट मार्जिन से चुनें या अपनी इच्छानुसार मार्जिन सेट करने के लिए कस्टम मार्जिन चुनें।
Page Orientation
Click on Page Layout Tab --> Orientation
Choose Portrait for tall format and Landscape for wide format
पेज ओरीएन्टेशन
पेज लेआउट टैब पर क्लिक करें -->ओरीएन्टेशन
लंबे प्रारूप के लिए पोर्ट्रेट और विस्तृत प्रारूप के लिए लैंडस्केप चुनें
Page Size
Click on Page Layout Tab --> Size
Choose a Page Size from drop down list or choose More Paper Sizes to set size as you wish
पेज साइज
पेज लेआउट टैब पर क्लिक करें --> साइज़
ड्रॉप डाउन सूची से पेज आकार चुनें या अपनी इच्छानुसार आकार सेट करने के लिए मोर पेपर साइज़ चुनें
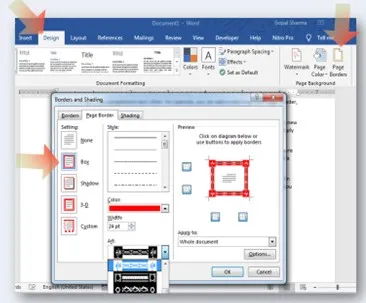
Apply a Page Border
Click on Design tab --> Page Borders
Choose a Page Border Style, you can also choose Art to use as page border.
पेज बॉर्डर लगाना
डिजाइन टैब पर क्लिक करें --> पेज बॉर्डर्स
पेज बॉर्डर स्टाइल चुनें, आप पेज बॉर्डर के रूप में उपयोग करने के लिए आर्ट भी चुन सकते हैं.
Apply a Page Color
Click on Design Tab --> Page Color
Choose your desire color from drop down color list box
पेज कलर लगाना
डिजाइन टैब पर क्लिक करें --> पेज कलर
ड्रॉप डाउन रंग सूची बॉक्स से अपनी इच्छा का कलर चुनें
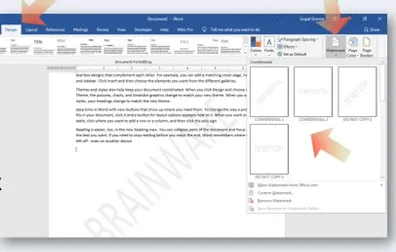
Apply Watermark in Page
Click on Design Tab --> Watermark
Create your Custom watermark or choose from predefine styles
पेज में वाटरमार्क लगाना
डिजाइन टैब पर क्लिक करें --> वॉटरमार्क
अपना कस्टम वॉटरमार्क बनाएँ या पहले से दिए हुए स्टाइल में से चुनें
Inserting Header, Footer or Page Number
Click on Insert Tab --> Header, Footer or Page Number
Choose a style from predefine styles of Header, Footer or Page Number or Create Your Own custom Format.
हेडर, फूटर और पेज नंबर लगाना
इन्सर्ट टैब पर क्लिक करें --> हेडर, फूटर या पेज नंबर
हेडर, फूटर या पेज नंबर की पूर्वनिर्धारित स्टाइल में से कोई स्टाइल चुनें या अपना खुद का कस्टम फॉर्मैट बनाएँ.
Using Page Break
You can Break Your Page at any Point.
To Insert Page Break
Click on Insert Tab then Click on Page Break Tool
Or
Click on Layout Tab then Click on Breaks then Page Option.
पेज ब्रेक का उपयोग करना
आप किसी भी जगह से अपने पेज को ब्रेक कर सकते हैं।
पेज ब्रेक लगाने के लिए
इन्सर्ट टैब पर क्लिक करें फिर पेज ब्रेक टूल पर क्लिक करें
या
लेआउट टैब पर क्लिक करें फिर ब्रेक फिर पेज ऑप्शन पर क्लिक करें।
Using Cover Page
MS-Word Provide best Cover Page Style for your Project.
To Apply a Predefine Cover Page Style Click on Insert Tab than Click on Cover Page option From Page Group. Now Choose Your best Style
कवर पेज का उपयोग करना
Ms-Word आपके प्रोजेक्ट के लिए सर्वश्रेष्ठ कवर पेज स्टाइल देता है.
एक पूर्वनिर्धारित कवर पेज स्टाइल लागू करने के लिए इन्सर्ट टैब पर क्लिक करे फिर पेज ग्रुप से कवर पेज ऑप्शन पर क्लिक करे । अब अपनी सर्वश्रेष्ठ स्टाइल चुनें
Insert Blank Page
If You need a new Blank Page at any time, you can use Insert Blank Page Option in MS word.
To Insert a blank page
Click on Insert Tab --> Blank Page from Page Group.
ब्लैंक पेज इन्सर्ट करना
यदि आपको किसी भी समय एक नया ब्लैंक पेज चाहिए, तो आप MS Word में इन्सर्ट ब्लैंक पेज ऑप्शन का उपयोग कर सकते हैं.
कोई ब्लैंक पेज लेने के लिए
इन्सर्ट टैब पर क्लिक करें.फिर पेज ग्रुप से ब्लैंक पेज पर क्लिक करे
Creating Hyperlinks (Ctrl+K)
Hyperlinks is way to redirect to other address form your page.
To Insert a hyperlink select your text then click on Insert Tab --> Link now choose your file to open or type a web link to open.
हाइपरलिंक बनाना (Ctrl+K)
हाइपरलिंक्स आपके पेज से अन्य पते पर रीडायरेक्ट करने का तरीका है।
हाइपरलिंक इन्सर्ट करने के लिए, अपने टेक्स्ट को सिलेक्ट करे, फिर इन्सर्ट टैब पर क्लिक करें --> लिंक अब अपनी उस फ़ाइल को चुने जिसे आप खोलना चाहते हैं
Creating Web Page
In MS-Word you can create web document in live mode , to create a web document use web layout view mode for best result.
Click on View Tab --> Web Layout to Create your Web Page .
वेब पेज बनाना
MS-Word में आप वेब डॉक्यूमेंट को लाइव मोड में बना सकते हैं, वेब डॉक्यूमेंट बनाने के लिए वेब लेआउट व्यू मोड का उपयोग करें.
अपना वेब पेज बनाने के लिए व्यू टैब --> वेब लेआउट पर क्लिक करें
Saving as Web Page
To Save Your Document as a web Page click on File Tab --> Save As now choose Web page form Save as type text box to save your document as a web page
वेब पेज के रूप मे सेव करना
अपने डॉक्यूमेंट को वेब पेज के रूप मे सेव करने के लिए फाइल टैब --> सेव एज पर क्लिक करें। अब फाइल को वेब पेज में सेव करने के लिए सेव एज टाइप टेक्स्ट बॉक्स से वेब पेज चुने। add slot
------------------------------------------------------------------------------------
Keyboard Shortcut A to Z with Ctrl
- Ctrl + A -- Select all contents of the page.
- Ctrl + B -- Bold highlighted selection.
- Ctrl + C -- Copy selected text.
- Ctrl + D -- Font options.
- Ctrl + E -- Align selected text or line to the center.
- Ctrl + F -- Open find box.
- Ctrl + G -- Find and replace options.
- Ctrl + H -- Find and replace options.
- Ctrl + I -- Italic highlighted selection.
- Ctrl + J -- Justify paragraph alignment.
- Ctrl + K -- Insert link.
- Ctrl + L -- Align selected text or line to the left.
- Ctrl + M -- Indent the paragraph.
- Ctrl + N -- Open new/blank document.
- Ctrl + O -- Open options.
- Ctrl + P -- Open the print window.
- Ctrl + Q -- Align selected paragraph to the left.
- Ctrl + R -- Align selected text or line to the right.
- Ctrl + S – Save
- Ctrl + T -- Hanging indent.
- Ctrl + U -- Underline highlighted selection.
- Ctrl + V -- Paste.
- Ctrl + W – Close current document.
- Ctrl + X -- Cut selected text.
- Ctrl + Y -- Redo the last action performed.
- Ctrl + Z -- Undo last action.


