Microsoft PowerPoint Notes in Hindi and English

Microsoft PowerPoint Notes in Hindi and English

Microsoft PowerPoint 2019 

Microsoft PowerPoint 2013, 2016 or 2019 is a presentation program that allows you to create dynamic slide presentations. These presentations can include animation, narration, images, videos, and much more

माइक्रोसॉफ्ट पावरपॉइंट 2019

Microsoft PowerPoint 2013, 2016 या 2019 एक प्रेज़न्टैशन प्रोग्राम है जो आपको डायनेमिक स्लाइड प्रेज़न्टैशन बनाने की अनुमति देता है. इन प्रेज़न्टैशन में एनीमेशन, कथन, चित्र, वीडियो और बहुत कुछ शामिल हो सकते हैं।


How to Open Ms-PowerPoint 2019 from Start Menu

How to Open Ms-PowerPoint 2019 from Start Menu

Open Start menu then type PowerPoint.

Locate PowerPoint application Icon and over it to open PowerPoint.

एमएस-पावरपोईंट 2019 को स्टार्ट मेनू से कैसे चालू करें

स्टार्ट मेनू खोलें, फिर PowerPoint टाइप करें।

PowerPoint को खोलने के लिए PowerPoint आइकन को देखे और फिर उसपे क्लिक करें 


How to Open Ms-PowerPoint 2019 with run command

How to Open Ms-PowerPoint 2019 with run command

Press Win+R to open Run command Dialog Box then Type “Powerpnt” and press Enter key.

एमएस-पावरपोईंट 2019 को रन कमांड से कैसे चालू करें

रन कमांड डाइलॉग बॉक्स खोलने के लिए Win+R दबाएँ, फिर "Powerpnt" टाइप करें और Enter की दबाएँ।


The PowerPoint 2019 interface


The PowerPoint 2019 interface

When you open PowerPoint for the first time, the Start Screen will appear. From here, you'll be able to create a new presentation, choose a template, and access your recently edited presentations. From the Start Screen, locate and select Blank Presentation to access the PowerPoint interface.

पावरपोईंट 2019 इंटरफ़ेस 

जब आप पहली बार PowerPoint खोलते हैं, तो स्टार्ट स्क्रीन दिखाई देगी। यहां से, आप एक नई प्रेज़न्टैशन बना पाएंगे, एक टेम्पलेट चुन सकते हैं, और अपनी हाल ही में एडिटेड प्रेज़न्टैशन तक पहुंच सकते हैं। स्टार्ट स्क्रीन से, PowerPoint इंटरफ़ेस तक पहुँचने के लिए ब्लैंक प्रेज़न्टैशन को देखे और उसको चुने.


Ms-PowerPoint Screen Components  एमएस पावरपोईंट 2019 स्क्रीन कॉमपोनेन्टस

Ms-PowerPoint Screen Components

एमएस पावरपोईंट 2019 स्क्रीन कॉमपोनेन्टस 


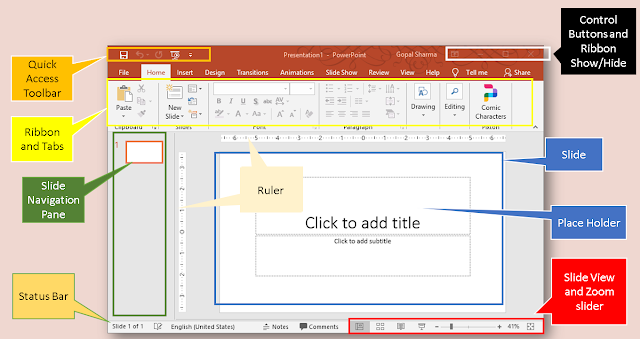
Quick Access Toolbar

Quick Access Toolbar

The Quick Access Toolbar lets you access common commands no matter which tab is selected. By default, it includes the Save, Undo, Redo and Slide Show  commands.

क्विक एक्सेस टूलबार 

क्विक एक्सेस टूलबार आपको सामान्य आदेशों तक पहुंचने देता है, इससे कोई फर्क नहीं पड़ता कि कौन सा टैब चुना गया है। डिफ़ॉल्ट रूप से, इसमें सेव, अन्डू, रीडो और स्लाइड शो आदेश शामिल हैं।


The Tell Me bar

The Tell Me bar

The Tell me bar allows you to search for commands, which is especially helpful if you don't remember where to find a specific command.

टेल मी बार  

टेल मी  बार आपको कमांड की खोज करने की अनुमति देता है, जो विशेष रूप से सहायक है यदि आपको याद नहीं है कि एक विशिष्ट कमांड कहां मिलेगा।


The Ribbon

The Ribbon

The Ribbon contains all of the commands you will need to perform common tasks in PowerPoint. It has multiple tabs, each with several groups of commands.

रिबन 

रिबन में वे सभी कमांड होते हैं जिनकी आपको PowerPoint में सामान्य कार्य करने के लिए आवश्यकता होगी. इसमें कई टैब हैं, जिनमें से प्रत्येक में कमांड के कई ग्रुप हैं।


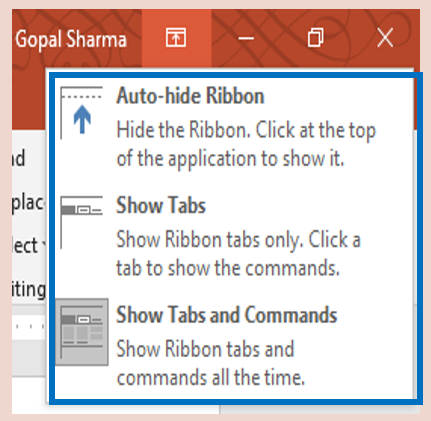
Showing and hiding the Ribbon

Showing and hiding the Ribbon  

If you find that the Ribbon takes up too much screen space, you can hide it. To do this, click the Ribbon Display Options arrow in the upper-right corner of the Ribbon, then select the desired option from the drop-down menu.

रिबन को शो और हाइड करना 

यदि आप पाते हैं कि रिबन बहुत अधिक स्क्रीन स्पेस लेता है, तो आप इसे छिपा सकते हैं। ऐसा करने के लिए, रिबन के ऊपरी-दाएँ कोने में रिबन डिस्प्ले ऑप्शन के एरो पर क्लिक करें, फिर ड्रॉप-डाउन मेनू से अपनी जरूरत के ऑप्शन का चयन करें।


Backstage view

Backstage view

Backstage view gives you various options for saving, opening a file, printing, and sharing your document. To access Backstage view, click the File tab on the Ribbon.

बैक्स्टैज व्यू  

बैकस्टेज व्यू आपको अपने डॉक्यूमेंट को सेव करने, फ़ाइल खोलने, प्रिन्ट करने और शेयर करने के लिए विभिन्न विकल्प देता है। बैकस्टेज व्यू तक पहुँचने के लिए, रिबन पर फ़ाइल टैब क्लिक करें.


Command Groups

Command Groups

Each group contains a series of different commands. Simply click any command to apply it. Some groups also have an arrow in the bottom-right corner, which you can click to see even more commands.

कमांड ग्रुप्स  

प्रत्येक ग्रुप में अलग अलग कमांड की सीरीज होती है। बस इसे लागू करने के लिए किसी भी कमांड पर क्लिक करें। कुछ ग्रुप्स में निचले-दाएं कोने में एक तीर भी होता है, जिसे आप और भी कमांड देखने के लिए क्लिक कर सकते हैं।


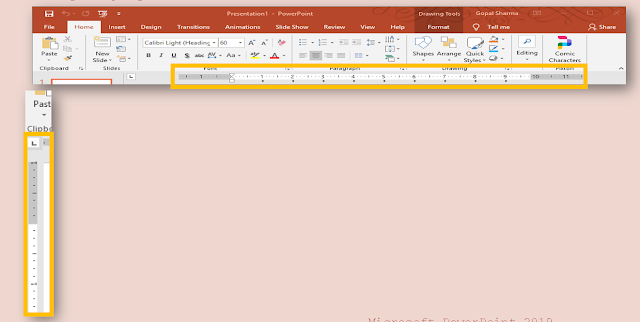
The Ruler

The Ruler

The Ruler is located at the top and to the left of your document. It makes  easier to make alignment and spacing adjustments. To show Ruler View --> Ruler

रूलर  

रूलर आपके डॉक्यूमेंट के शीर्ष और बाईं ओर स्थित है। यह alignment और स्पेस को करना आसान बनाता है। रूलर दिखाने के लिए व्यू  -> रूलर 


The Ruler, guides, and gridlines

The Ruler, guides, and gridlines

PowerPoint includes several tools to help organize and arrange content on your slides, including the Ruler, guides, and gridlines. These tools make it easier to align objects on your slides. Simply click the checkboxes in the Show group on the View tab to show and hide these tools.

रूलर, गाइड और ग्रिडलाइन

PowerPoint में आपकी स्लाइड्स पर कंटेन्ट को व्यवस्थित और अरैन्ज करने में मदद करने के लिए कई टूल्स शामिल हैं, जिनमें रूलर, गाइड और ग्रिडलाइन शामिल हैं. ये टूल्स आपकी स्लाइड्स पर ऑब्जेक्ट्स को align करना आसान बनाते हैं. इन टूल्स को दिखाने और छिपाने के लिए बस व्यू टैब पर शो ग्रुप में चेकबॉक्स पर क्लिक करें। 


Slides View Options

Slides View Options

PowerPoint has a variety of viewing options that change how your presentation is displayed. You can choose to view your presentation in Normal view, Slide Sorter view, Reading view, or Slide Show view. Switching between slide views is easy. Just locate and select the desired slide view command in the bottom-right corner of the PowerPoint window.

स्लाइड व्यू  विकल्प

PowerPoint में विभिन्न प्रकार के व्यू के विकल्प होते हैं जो आपकी प्रेज़न्टैशन के प्रदर्शन के तरीके को बदलते हैं. आप अपनी प्रेज़न्टैशन को नॉर्मल व्यू, स्लाइड सॉर्टर व्यू, रीडिंग व्यू या स्लाइड शो व्यू  में देखना चुन सकते हैं. स्लाइड व्यू के बीच स्विच करना आसान है. बस PowerPoint विंडो के निचले-दाएँ कोने में अपनी इच्छा के स्लाइड व्यू कमांड का पता लगाएँ और उसको चुने। 


Zoom Control

Zoom Control

Click and drag the slider to use the zoom control. The number to the right of the slider bar reflects the zoom percentage.

ज़ूम कंट्रोल 

ज़ूम कंट्रोल  का उपयोग करने के लिए स्लाइडर को क्लिक करें और खींचें. स्लाइडर बार के दाईं ओर की संख्या ज़ूम प्रतिशत को दर्शाती है।


The Status Bar

The Status Bar

Status Bar locate at the bottom of window. Here you can find Total Number of slide in current Presentation , Notes , comments with spelling & grammar and caps lock status etc.

स्टैटस बार 

स्टैटस बार विंडो के निचले भाग में स्थित है। यहां आप वर्तमान प्रेज़न्टैशन में स्लाइड की कुल संख्या, नोट्स, स्पेलिंग और ग्रामर के साथ कमेंट्स और कैप्स लॉक स्थिति आदि पा सकते हैं।


Backstage view बैक्स्टैज व्यू

Backstage view

बैक्स्टैज व्यू 

Backstage view Options
बैक्स्टैज व्यू ऑप्शन 


Return to PowerPoint
You can use the arrow to close Backstage view and return to PowerPoint.
बैकस्टेज व्यू  बंद करने और PowerPoint पर लौटने के लिए आप तीर का उपयोग कर सकते हैं.

Info
The Info pane will appear whenever you access Backstage view. It contains information about the current presentation.
जब भी आप बैकस्टेज व्यू पर पहुँचते हैं, तो आपको info pane दिखाई देगा. इसमें वर्तमान प्रेज़न्टैशन के बारे में जानकारी होती है.

New
From here, you can create a new blank presentation or choose from a large selection of templates.
यहां से, आप एक नई ब्लैंक प्रेज़न्टैशन बना सकते हैं या टेम्पलेट्स के बड़े चयन से चुन सकते हैं।

Open
From here, you can open recent presentations, as well as presentations saved to your OneDrive or on your computer.
यहाँ से, आप रीसन्ट प्रेज़न्टैशन  खोल सकते हैं, साथ ही अपने OneDrive या अपने कंप्यूटर पर सेव की गई प्रेज़न्टैशन भी खोल सकते हैं.

Save and Save As
Use Save and Save As to save your presentation to your computer or to your OneDrive.
अपनी प्रेज़न्टैशन को अपने कंप्यूटर या अपने OneDrive पर सेव के लिए सेव और सेव एज का उपयोग करें.

Print
From the Print pane, you can change the print settings and print your presentation. You can also see a preview of your presentation.
प्रिन्ट pane से, आप प्रिन्ट सेटिंग्स बदल सकते हैं और अपनी प्रेज़न्टैशन प्रिन्ट कर सकते हैं. आप अपनी प्रेज़न्टैशन का प्रीव्यू भी देख सकते हैं..

Share
From here, you can invite people to view and collaborate on your presentation. You can also share your presentation by emailing it as an attachment.
यहां से, आप लोगों को अपनी प्रेज़न्टैशन देखने और उस पर सहयोग करने के लिए आमंत्रित कर सकते हैं. आप अपनी प्रेज़न्टैशन को attachment  के रूप में ईमेल करके भी शेयर  कर सकते हैं।

Export
You can choose to export your presentation in another format, such as PDF/XPS or PowerPoint 97-2003.
आप अपनी प्रेज़न्टैशन को किसी अन्य स्वरूप, जैसे PDF/XPS या PowerPoint 97-2003 में export करना चुन सकते हैं.

Close
Click here to close the current presentation.
वर्तमान प्रेज़न्टैशन को बंद करने के लिए यहाँ क्लिक करें.

Account
From the Account pane, you can access your Microsoft account information, modify your theme and background, and sign out of your account.
अकाउंट pane से, आप अपनी Microsoft अकाउंट जानकारी तक पहुँच सकते हैं, अपनी थीम और बैकग्राउंड बदल सकते हैं, और अपने अकाउंट से साइन आउट कर सकते हैं.

Options
Here, you can change various PowerPoint options, settings, and language preferences.
यहाँ, आप विभिन्न PowerPoint ऑप्शन, सेटिंग्स, और भाषा प्राथमिकताएँ बदल  सकते हैं।


To create a new presentation

To create a new presentation

MS PowerPoint Provides two way to create a new Presentation. One is start with a Blank Presentation  or start with Template.
To create a New Presentation click on File -> New (Now choose your Mode Blank Presentation or from Template from Backstage view option.)

नई प्रेज़न्टैशन बनाने के लिए

MS PowerPoint एक नई प्रेज़न्टैशन बनाने के लिए दो तरीके देता है। एक ब्लैंक प्रेज़न्टैशन के साथ शुरू करें या टेम्पलेट से शुरू करें. 
एक नई प्रेज़न्टैशन बनाने के लिए File -> New पर क्लिक करें (अब ब्लैंक प्रेज़न्टैशन चुनें या बैकस्टेज व्यू विकल्प से टेम्पलेट चुनें।


To Save a new presentation

To Save a Presentation click on file -> save (Type a name for your Presentation and choose your Presentation from Save as type list box) Click on Save button to Save. You can save your presentation as PowerPoint Presentation or PDF or PowerPoint Show etc. from here. 

नई प्रेज़न्टैशन सेव करने के लिए

प्रेज़न्टैशन को सेव करने के लिए file -> save पर क्लिक करें (अपनी प्रेज़न्टैशन के लिए एक नाम लिखें और अपनी प्रेज़न्टैशन  को save as type लिस्ट बॉक्स से चुनें) सेव करने के लिए सेव बटन पर क्लिक करें। यहां से आप अपनी प्रेज़न्टैशन को PowerPoint प्रेज़न्टैशन या PDF या PowerPoint शो आदि के रूप में सहेज सकते हैं. 

Save as type file format सेव एज टाइप फाइल फॉर्मैट
Save as type file format
सेव एज टाइप फाइल फॉर्मैट 


To open an existing presentation

To open an existing presentation

To open an existing presentation click on File Tab -> Open (choose your location to open a file then click on your file name from open dialog box) click on Open button to open.
You can also use Recent list to open a recent saved file from Backstage view.

मौजूदा प्रेज़न्टैशन ओपन करने के लिए

एक मौजूदा प्रेज़न्टैशन खोलने के लिए, File tab -> open पर  क्लिक करें (फ़ाइल को खोलने के लिए लोकैशन चुनें फिर  ओपन डाइलॉग बॉक्स से अपने फाइल नेम पर क्लिक करे ) खोलने के लिए ओपन बटन पर क्लिक करें। 
हाल ही में सेव की गई फ़ाइल को खोलने के लिए आप बैकस्टेज व्यू से recent लिस्ट का भी उपयोग कर सकते हैं।


To add a new slide

To add a new slide

You need more than a one slide to create a good Presentation. To add more slide in your presentation click on Home tab -> New Slide (choose your layout to add a new slide)

न्यू स्लाईड जोड़ने के लिए

एक अच्छी प्रेज़न्टैशन बनाने के लिए आपको एक से अधिक स्लाइड की आवश्यकता होती है. अपनी पप्रेज़न्टैशन में और अधिक स्लाइड जोड़ने के लिए Home टैब -> न्यू स्लाईड  पर क्लिक करें (नई स्लाइड जोड़ने के लिए अपना लेआउट चुनें)


Appling a Theme

Appling a Theme

A theme is a predefined combination of colors, fonts, and effects that can quickly change the look and feel of your entire slide show. To apply a theme click on Design Tab and Select the desired theme.

 थीम लगाना

एक थीम रंगों, फोंट और इफेक्ट का एक पूर्वनिर्धारित combination  है जो आपके पूरे स्लाइड शो के लुक और फील को जल्दी से बदल सकता है। थीम लागू करने के लिए डिज़ाइन टैब पर क्लिक करें और अपनी मनपसंद थीम का चयन करें।


Slide Transitions

Slide Transitions

The effect that is used between switching slides is known as slide transition. Slide transition give a wonderful effect and cover the gape between two slides when switching.

स्लाइड ट्रान्ज़िशन 

 स्लाइड से स्लाईड के बीच बदलाव का जो इफेक्ट होता है उसे स्लाइड ट्रान्ज़िशन के रूप में जाना जाता है। स्लाइड ट्रान्ज़िशन एक अद्भुत प्रभाव देता है और स्विच करते समय दो स्लाइडों के बीच के अंतर को कवर करता है।

To apply Slide Transitions

Click a slide to apply slide transition then click on Transitions Tab and choose a effect from Transition to this slide group gallery.

स्लाइड ट्रान्ज़िशन लगाने के लिए 

स्लाइड ट्रान्ज़िशन लागू करने के लिए स्लाइड पर क्लिक करें, फिर ट्रान्ज़िशन टैब पर क्लिक करें और इस स्लाइड ग्रुप गैलरी में ट्रान्ज़िशन से एक प्रभाव चुनें।


Animations

Animations

The movement effect that is use to animate an object, graphics, text, image or clipart are comes under animations in PowerPoint. There are four types of animation in PowerPoint
Entrance, Emphasis, Exit and Motion Paths

एनिमेशन 

किसी ऑब्जेक्ट, ग्राफ़िक्स, टेक्स्ट, इमेज या क्लिपआर्ट को एनिमेट करने के लिए उपयोग किया जाने वाला मूवमेंट इफेक्ट  PowerPoint में ऐनिमेशन कहलाता  है. PowerPoint में ऐनिमेशन चार प्रकार के होते हैं 
Entrance, Emphasis, Exit and Motion Paths

How to set Animation

First select that object, text or graphics which you want to animate. Then click on Animations Tab , now choose a effect from animation group gallery for your object or text or graphics.

You can also add more than one animation in an object or text or graphics in PowerPoint. To add more than a animation effect use Add Animation option  from Advanced animation group of Animations Tab.

एनिमेशन कैसे सेट करें 

सबसे पहले उस ऑब्जेक्ट, टेक्स्ट या ग्राफिक्स का चयन करें जिसे आप एनिमेट करना चाहते हैं। फिर एनिमेशन टैब पर क्लिक करें, अब अपने ऑब्जेक्ट या टेक्स्ट या ग्राफिक्स के लिए एनीमेशन ग्रुप गैलरी से एक इफेक्ट चुनें। 

आप PowerPoint में किसी ऑब्जेक्ट या टेक्स्ट या ग्राफ़िक्स में एक से अधिक ऐनिमेशन भी जोड़ सकते हैं. एक से अधिक ऐनिमेशन इफेक्ट जोड़ने के लिए ऐनिमेशन टैब के अड्वान्स ऐनिमेशन ग्रुप से ऐड ऐनिमेशन ऑप्शन का उपयोग करें.


Inserting Text

Inserting Text

In PowerPoint you need Place Holder to insert text in Your Presentation. You can also use Word art Option to add text in your slide.

To add a text place holder click on Insert Tab than Text Box from Text group.

टेक्स्ट इन्सर्ट करना

PowerPoint में आपको अपनी प्रेज़न्टैशन में टेक्स्ट इन्सर्ट करने के लिए प्लेस होल्डर की आवश्यकता होती है. आप अपनी स्लाइड में टेक्स्ट जोड़ने के लिए Word Art Option का भी उपयोग कर सकते हैं. 

टेक्स्ट प्लेस होल्डर जोड़ने के लिए, इन्सर्ट टैब मे टेक्स्ट ग्रुप से टेक्स्ट बॉक्स पर क्लिक करें.


Formatting Text

Formatting Text

You can you WordArt option to use predefine format for your text. You can also manually format your text with help of font and Paragraph group from Home Tab.

टेक्सट को फोरमेट करना

आप अपने टेक्स्ट के लिए पूर्वनिर्धारित प्रारूप का उपयोग करने के लिए वर्डआर्ट विकल्प का उपयोग कर सकते हैं। आप होम टैब से फॉन्ट और पैराग्राफ ग्रुप की मदद से अपने टेक्स्ट को मैन्युअल रूप से फॉर्मेट भी कर सकते हैं।


How to Play Slide Show

How to Play Slide Show

Slide Show tab > From Beginning 
Or 
Press F5 
Or 
Click on slide show button

स्लाइड शो कैसे चलाए

स्लाइड शो टैब > from बिगिनिंग 
 या 
F5 दबाएँ 
या
स्लाइड शो बटन पर क्लिक करें


Project On PowerPoint

PowerPoint पर प्रोजेक्ट

Create and format slide given bellow

नीचे दी गई स्लाइड बनाएँ और फॉर्मैट करें


PowerPoint Project Slide

PowerPoint Project Slide1

PowerPoint Project Slide 2

PowerPoint Project Slide 3

PowerPoint Project Slide 4

PowerPoint Project Slide 5

PowerPoint Project Slide 6

PowerPoint Project Slide 7